iOS SDK integration
For using quantumgraph iOS-SDK, do the following steps.
- Install our quantumgraph iOS-SDK
- Generate a .p12 file
- Using iOS-SDK
Installing iOS SDK Library
Using Cocoapods
The easiest way to integrate quantumgraph iOS SDK into your iOS project is to use CocoaPods.
Install CocoaPods using
gem install cocoapodsIf you are using Cocoapods for the first time, run
pod setupto create a local CocoaPods spec mirror.Create a file named
Podfilein your Xcode project directory and add the following line in it:pod 'quantumgraph'
Alternatively, in the terminal, in the xcode project directory, type:
pod init
Your pod file is created and now you can add
pod 'quantumgraph'to the specific targets you want.Run
pod installin Xcode project directory. Cocoapods will downloads and install the quantumgraph iOS-SDK library and create a new Xcode workspace. From now on you should use this workspace.
Manual installation
Download the SDK from here:
For Objective C: http://app.qgraph.io/static/sdk/ios/QGSdk-ObjC-3.3.4.zip
For Swift: http://app.qgraph.io/static/sdk/ios/QGSdk-Swift-3.3.4.zip
In your Xcode project, Go to File, add new Group to your project and name it as QGSdk.
Add libQSdk.a and QGSdk.h in QGSdk group
Go to Project -> Target -> Build Phases. In the section “Link Binary with Libraries”, add following frameworks:
- AdSupport.framework
- SystemConfiguration.framework
- CoreTelephony.framework
- CoreLocation.framework
- ImageIO.framework
- MobileCoreServices.framework
- libz.tbd
We track location only if you initialize location service. If you don’t add location usage key in info.plist file, we don’t track the location of the user.
However, you do not need to add these frameworks if you use cocoapods.
Generating .p12 file
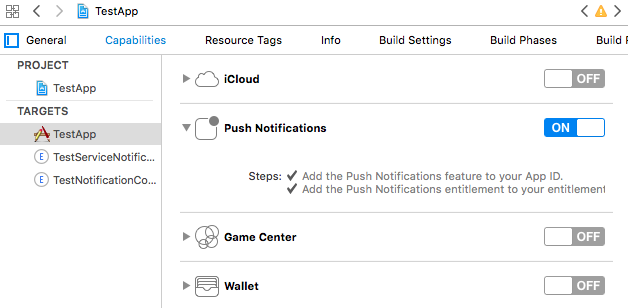
Generating SSL Certificate for APP ID
- Log in to the iOS Dev Center and select the Certificates, Identifiers and Profiles
- Go to App IDs in the Identifiers Section of the sidebar and select your app if automatically created. Skip to Step 6.
- To create new App click + and fill the details for App ID, App Services (Check the push notification Checkbox) and Explicit App ID(Should be same as Bundle ID in your App)
- You will be asked to verify the details of the app id, if everything seems okay click Register.
- In the Push Notification row there are two orange lights that say “Configurable” in the Development and Distribution column.
- Select your App ID and click on EDIT.
- If Push Notification is not enabled, enable it to make it configurable.
- Select the Create Certificate in the Development/Production SSL Certificate
- In the next step it will ask you for generating a CSR
Generating the Certificate Signing Request
Open Keychain Access on your Mac and choose the menu option Certificate Assistant -> Request a Certificate from a Certificate Authority
Enter some descriptive name for Common Name (Give your app name appended by QGraph preferably to identify it)
Check Save to disk option and click continue. It saves a .certSigningRequest file.
In the Keys section of the Keychain Access, a new private key would have appeared with Common name specified
In the “App IDs” section in the apple developer account, choose the CSR that you generated to create the push certificate
Click Continue and download the certificate
Double click on the downloaded certificate. This will add your certificate to your private key in your keychain
Go to Keys section in the Keychain and find your private key
You should be able to expand the private key and find your certificate with it. Select both the private key and the certificate after expanding (as shown in the snapshot)
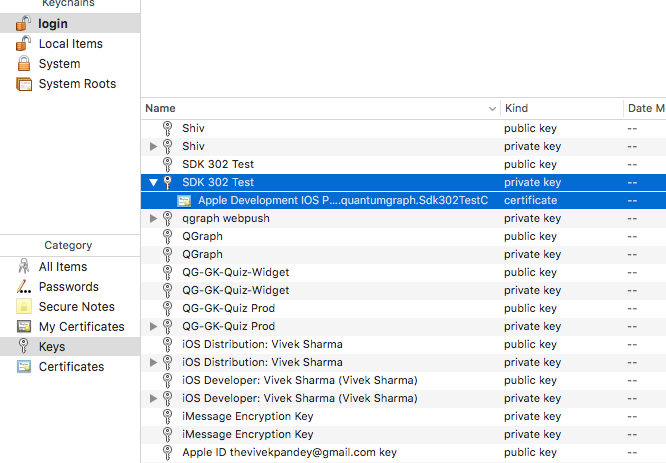
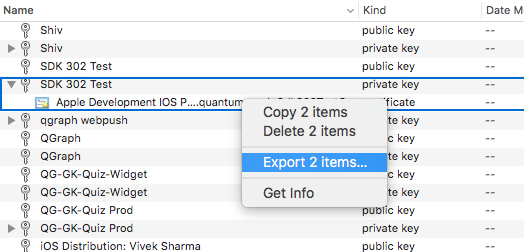
Right click on it to export it as .p12 file. Make sure you are exporting 2 items as shown
Name your file as your_app_name and save it with file format .p12
You will be prompted to enter a password. You can directly click Ok or add any password to it. If you add any password please remember it and send it along with your .p12 file.
In the next step, you will require your system password to finally save the file.
Your p12 file is ready to be exported. Upload it in your account. Go to “Integration” -> “iOS” to upload p12 files.
Using iOS SDK - Objective C
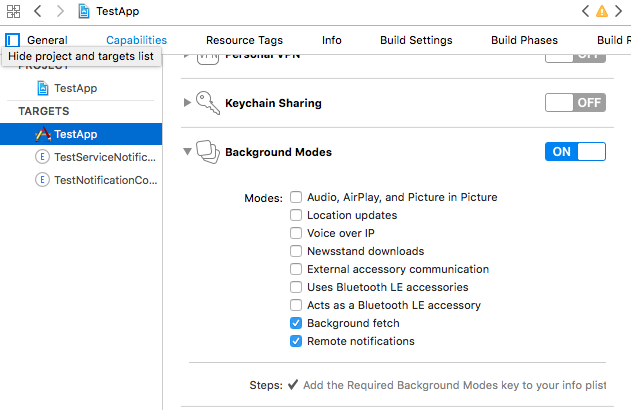
Change required for APNS Token and User Tracking
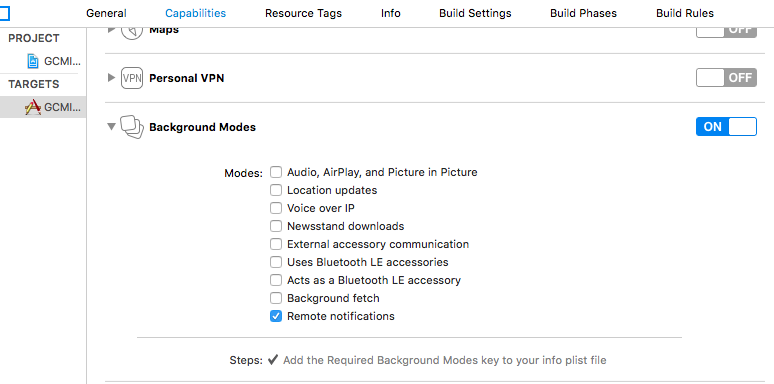
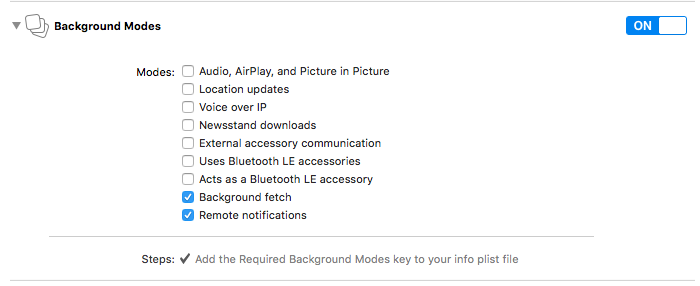
It is required by QG SDK that you enable Background Mode in the Capabilities section of the main app target. After enabling background modes, select Remote Notification as shown in the snapshot.
AppDelegate Changes
To initialise the library, in AppDelegate add #import "QGSdk.h"
In didFinishLaunchingWithOptions method of AppDelegate, add the following code for registering for remote notification:
(BOOL)application:(UIApplication *)application didFinishLaunchingWithOptions:(NSDictionary *)launchOptions {
    if (floor(NSFoundationVersionNumber) < NSFoundationVersionNumber_iOS_8_0) {
        // here you go with iOS 7
        [[UIApplication sharedApplication] registerForRemoteNotificationTypes: (UIRemoteNotificationTypeBadge | UIRemoteNotificationTypeSound | UIRemoteNotificationTypeAlert)];
    } else {
        // registering push notification in ios 8 and above
        UIUserNotificationType types = UIUserNotificationTypeAlert | UIUserNotificationTypeSound |
        UIUserNotificationTypeBadge;
        UIUserNotificationSettings *settings = [UIUserNotificationSettings settingsForTypes:types
        categories:nil];
        [[UIApplication sharedApplication] registerUserNotificationSettings:settings];
    }
    //replace <your app id> with the one you received from QGraph
    [[QGSdk getSharedInstance] onStart:@"<YOUR APP ID>" setDevProfile:NO];

    return YES;
}
Note that [[UIApplication sharedApplication] registerForRemoteNotifications] is called by our SDK for iOS 8 and iOS 9.
For development profile, set Boolean to YES in the following method:
[[QGSdk getSharedInstance] onStart:@"<your app id>" setDevProfile:YES];
Just build and run the app to make sure that you receive a message that app would like to send push notification. If you get code signing error, make sure that proper provisioning profile is selected
Add the following code in AppDelegate.m to get the device token for the user:
- (void)application:(UIApplication*)application didRegisterForRemoteNotificationsWithDeviceToken:(NSData*)deviceToken
{
        NSLog(@"My token is: %@", deviceToken);
        [[QGSdk getSharedInstance] setToken:deviceToken];
}

- (void)application:(UIApplication*)application didFailToRegisterForRemoteNotificationsWithError:(NSError*)error
{
        NSLog(@"Failed to get token, error: %@", error.localizedDescription);
}
QGSdk setToken method will log user’s token so that you can send push notification to the user.
Handling Push Notification
Notifications are delivered while the app is in foreground, background or not running state. We can handle them in the following delegate methods.
If the remote notification is tapped, the system launches the app and the app calls its
delgate’s application:didFinishLaunchingWithOptions: method, passing in the notification payload (for remote notifications). Although application:didFinishLaunchingWithOptions: is not the best place to handle the notification, getting the payload at this point gives you the opportunity to start the update process before your handler method is called.
For remote notifications, the system also calls the application:didReceiveRemoteNotification:fetchCompletionHandler: method of the app delegate.
You can handle the notification and its payload as described:
- (BOOL)application:(UIApplication *)application didFinishLaunchingWithOptions:(NSDictionary *)launchOptions {

    // Payload can be handled in this way
    NSDictionary *notification = [launchOptions objectForKey:UIApplicationLaunchOptionsRemoteNotificationKey];
    if (notification) {
       // you custom methods…
    }
    return YES;
}
The notification is delivered when the app is running in the foreground. The app calls the
application:didReceiveRemoteNotification:fetchCompletionHandler: method of the app
delegate. (If application:didReceiveRemoteNotification:fetchCompletionHandler: is not
implemented, the system calls application:didReceiveRemoteNotification:.) However, it
is advised to use application:didReceiveRemoteNotification:fetchCompletionHandler:
method to handle push notification.
Implementation:
- (void)application:(UIApplication *)application didReceiveRemoteNotification:(NSDictionary *)userInfo
  fetchCompletionHandler:(void (^)(UIBackgroundFetchResult result))handler {
      // Please make sure you add this method
      [[QGSdk getSharedInstance] application:application didReceiveRemoteNotification:userInfo];

      handler(UIBackgroundFetchResultNoData);
      NSLog(@"Notification Delivered”);
  }
You can also handle background operation using the above method once remote notification is delivered. For this make sure, wake app in background is selected while creating a campaign to send the notification.
If you have implemented application:didReceiveRemoteNotification: add method [[QGSdk getSharedInstance] application:application didReceiveRemoteNotification:userInfo]; inside it. Your implementation should look like:
- (void)application:(UIApplication *)application didReceiveRemoteNotification:(NSDictionary *)userInfo {
    [[QGSdk getSharedInstance] application:application didReceiveRemoteNotification:userInfo];
}
Changes for iOS 10
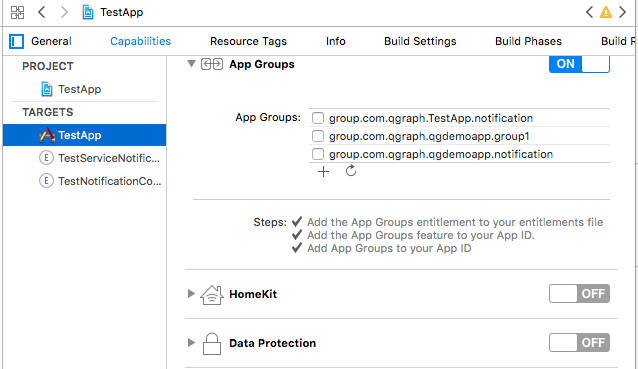
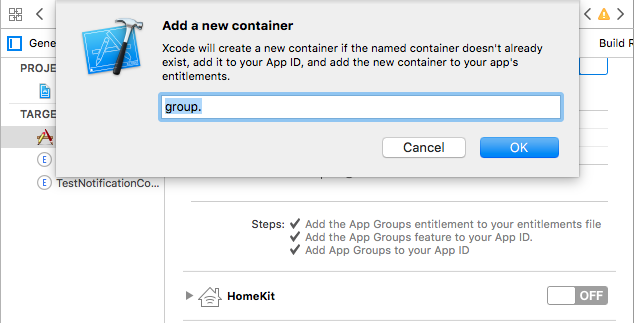
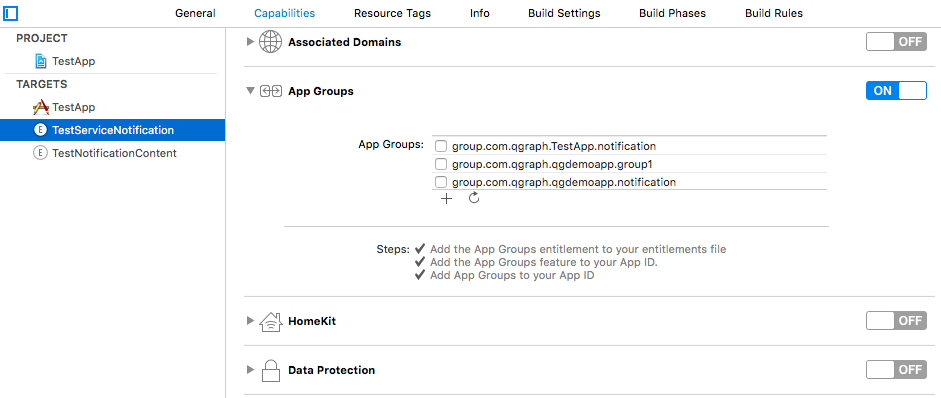
For integrating QGraph notification SDK, you need to add Capabilities APP GROUPS. Go to Project > Main Target > Capabilities. Check on App Groups and add a group as below. Use your bundle id to create App Group. For example, if your bundle id is com.company.appname, App Group could be group.com.company.appname.xyz.

You need App Group so that data can be shared between extensions. Use that App Group name in onStart:withAppGroup:setDevProfile: in App Delegate.
AppDelegate Changes for iOS 10
Add framework UserNotifications to app target and import in app delegate
#import <UserNotifications/UserNotifications.h>

//Define macros for checking iOS version
#define SYSTEM_VERSION_GREATER_THAN_OR_EQUAL_TO(v)  ([[[UIDevice currentDevice] systemVersion] compare:v options:NSNumericSearch] != NSOrderedAscending)
#define SYSTEM_VERSION_LESS_THAN(v)                 ([[[UIDevice currentDevice] systemVersion] compare:v options:NSNumericSearch] == NSOrderedAscending)

- (BOOL)application:(UIApplication *)application didFinishLaunchingWithOptions:(NSDictionary *)launchOptions {
    // Override point for customization after application launch.

    QGSdk *qgsdk = [QGSdk getSharedInstance];

    [qgsdk onStart:@"<app_id>" withAppGroup:@“group.com.company.product.extension” setDevProfile:true];

    if (SYSTEM_VERSION_GREATER_THAN_OR_EQUAL_TO(@"10.0")) {
        UNAuthorizationOptions options = (UNAuthorizationOptions) (UNAuthorizationOptionAlert | UNAuthorizationOptionBadge | UNAuthorizationOptionSound | UNAuthorizationOptionCarPlay);

        UNUserNotificationCenter *center = [UNUserNotificationCenter currentNotificationCenter];
        center.delegate = self;

        NSSet *categories = [NSSet setWithObjects:[qgsdk getQGSliderPushActionCategoryWithNextButtonTitle:nil withOpenAppButtonTitle:nil], nil];
        [center setNotificationCategories:categories];

        [center requestAuthorizationWithOptions:options completionHandler:^(BOOL granted, NSError *error){
            NSLog(@"GRANTED: %i, Error: %@", granted, error);
        }];
    } else if (SYSTEM_VERSION_LESS_THAN(@"10.0")) {
        UIUserNotificationType types = UIUserNotificationTypeAlert | UIUserNotificationTypeSound |
        UIUserNotificationTypeBadge;
        UIUserNotificationSettings *settings = [UIUserNotificationSettings settingsForTypes:types
                                                                                 categories:nil];
        [[UIApplication sharedApplication] registerUserNotificationSettings:settings];
    }
    return YES;
}
NOTE: If you have your own existing notification action category for iOS 10, you can add it along with Graph CAROUSEL/SLIDER category implemented as above. For the carousel and slider push action buttons, you can also specify button titles. Next button will be used to animate the carousel/slider and Open App Button will open the app with deeplink if any.
Handling Push Notification in iOS 10
There are new delegate methods introduced in iOS 10 to track notification and display in foreground state as well. To track notifications in background state, you need to enable background mode in the capabilities. Above all these you need to activate push notification in the capabilities. This will add entitlement files to your app target.
- You might have already included this method. Please make sure
[[QGSdk getSharedInstance] application:application didReceiveRemoteNotification:userInfo];is added in it. It is required to track notifications.
//used for silent push handling
//pass completion handler UIBackgroundFetchResult accordingly
- (void)application:(UIApplication *)application didReceiveRemoteNotification:(nonnull NSDictionary *)userInfo fetchCompletionHandler:(nonnull void (^)(UIBackgroundFetchResult))completionHandler {
   [[QGSdk getSharedInstance] application:application didReceiveRemoteNotification:userInfo];
   completionHandler(UIBackgroundFetchResultNoData);
}
- The method will be called on the delegate only if the application is in the foreground. If the method is not implemented or the handler is not called in a timely manner then the notification will not be presented. The application can choose to have the notification presented as a sound, badge, alert and/or in the notification list. This decision should be based on whether the information in the notification is otherwise visible to the user.
- (void)userNotificationCenter:(UNUserNotificationCenter *)center willPresentNotification:(UNNotification *)notification withCompletionHandler:(void (^)(UNNotificationPresentationOptions options))completionHandler {
    [[QGSdk getSharedInstance] userNotificationCenter:center willPresentNotification:notification];

    [UIApplication sharedApplication].applicationIconBadgeNumber = 0;
    UNNotificationPresentationOptions option = UNNotificationPresentationOptionBadge | UNNotificationPresentationOptionSound | UNNotificationPresentationOptionAlert;

    completionHandler(option);
}
- The method will be called on the delegate when the user responded to the notification by opening the application, dismissing the notification or choosing a UNNotificationAction. The delegate must be set before the application returns from applicationDidFinishLaunching:.
NOTE: This method is specifically required for carousel and slider push to work. Also used to track notification_clicked event for QGraph push.
- (void)userNotificationCenter:(UNUserNotificationCenter *)center didReceiveNotificationResponse:(UNNotificationResponse *)response withCompletionHandler:(void(^)())completionHandler {
    [[QGSdk getSharedInstance] userNotificationCenter:center didReceiveNotificationResponse:response];
    completionHandler();
}
Handling Deeplink for QGraph Push
For Push notifications deeplinks should be handled in the method didReceiveNotificationResponse:withCompletionHandler: as described below. You can get the deeplink url and then pass it to openUrl: and then you should get a callback in the application:openUrl:options where you can handle the opening of a specific page.
- (void)userNotificationCenter:(UNUserNotificationCenter *)center didReceiveNotificationResponse:(UNNotificationResponse *)response withCompletionHandler:(void(^)())completionHandler {
    NSDictionary *userInfo = response.notification.request.content.userInfo;
    if ([userInfo objectForKey:@"deepLink"]) {
        NSURL *url = [NSURL URLWithString:userInfo[@"deepLink"]];
        dispatch_async(dispatch_get_main_queue(), ^{
            [[UIApplication sharedApplication] openURL:url];
        });
    }
    [[QGSdk getSharedInstance] userNotificationCenter:center didReceiveNotificationResponse:response];
    completionHandler();
}
For any deeplink specified in In-App campaigns, you should get a callback in the below method. You need to handle it on your own to open any specific page.
- (BOOL)application:(UIApplication *)app openURL:(NSURL *)url options:(NSDictionary<NSString *,id> *)options {
    NSLog(@"deeplink");
    return true;
}
Adding Extensions for iOS Push with Attachment and QGraph Carousel and Slider Push
In iOS 10, two frameworks has been introduced for handling push notification with content. You can have a push notification with image, gif, audio and video. Apart from that you can also have your custom UI for notifications. For this, payload can be modified and used to download content before the notification is drawn. You simply need to follow the below steps to add two of the extensions targets for handling these notifications: Service Extension and Content Extension.
Before proceeding make sure to download all the QGraph files to be used here. You should have these files with you
- QGNotificationSdk
- QGNotificationServiceExtension
- QGNotificationContentExtension
NOTE: These files are to be used with service and content extensions only. Do not add them to main app target.
Notification Service Extension
Service extension is basically the target extension where you get a callback when a push is delivered to the device. You can download and create attachments here. If you fail to download the content and pass it to contentHandler within certain time, default standard notification will be drawn.
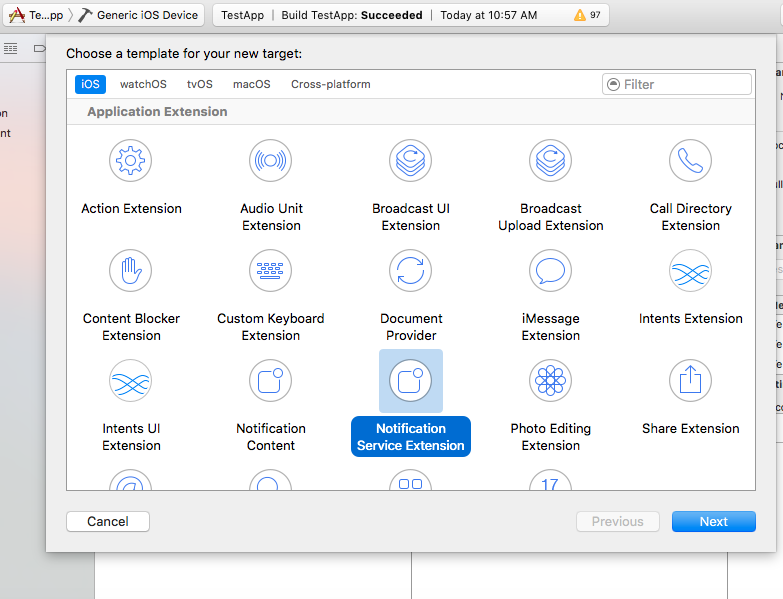
Adding Service extension
Add an iOS target and choose Notification Service extension and proceed. Add a product name and Finish. When created you will be prompted to activate the target. Once activated, you can see 3 files added, NotificationService (.h and .m ) and Info.plist.
Please delete the NotificationService.h and NotificationService.m files.
Add files from QGNotificationServiceExtension
Go to project navigator and select the Service Extension Target
Select Capabilities and check on App Group and select the APP GROUP which you added to your main app target.

Go to NotificationService.m and change your app group
static NSString *APP_GROUP = @"group.com.company.product.extension";
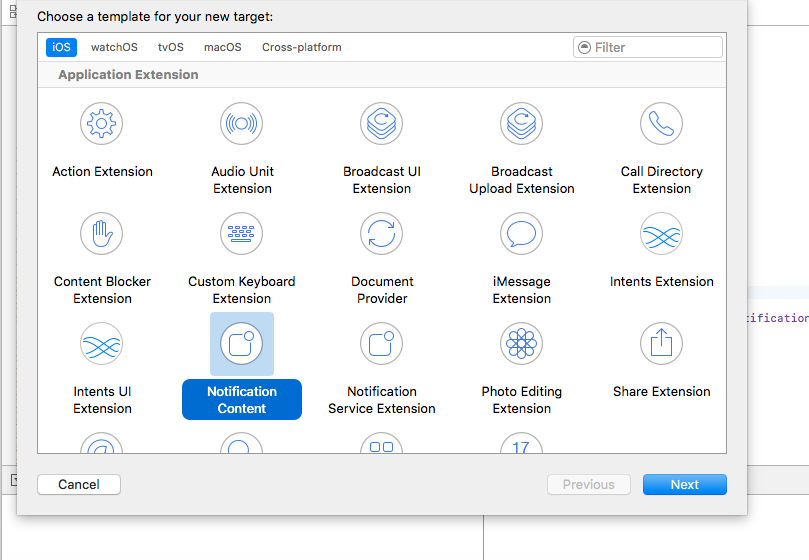
Adding Content Extension
Add an iOS target and choose Notification Content extension and proceed. Add a product name and Finish. When created you will be prompted to activate the target. Once activated, you can see 4 files added, NotificationViewController (.h and .m), MainInterface.storyboard and Info.plist.
Please delete NotificationViewController and MainInterface.storyboard.
Add these files from QGNotificationContentExtension.
As done above, enable App Groups and select the same app group through capabilities of the content extension target.
Go to NotificationViewController.m and change your app group
static NSString *APP_GROUP = @"group.com.company.product.extension";
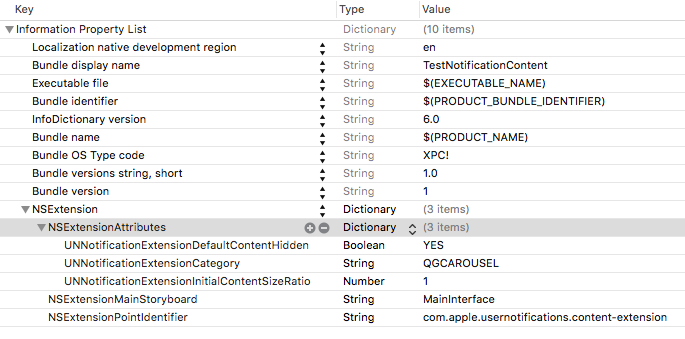
Go to Info.plist and add UNNotificationExtensionDefaultContentHidden (Boolean) - YES and UNNotificationExtensionCategory (string) - QGCAROUSEL in NSExtensionAttributes dict of NSExtension dict as shown in the screenshot.
Add QuartzCore.framework in this target.
Add QGNotificationSdk to both extension targets. Do not add it to main app target.
NOTE:
- Please make sure APP_GROUP used in all the three targets are same.
- Set the deployment target to 10.0 in both the extensions.
- Remove -ObjC/$(inherited) (if it exists) from build settings of service and content extension targets.
Click Through and View Through Attribution
QGraph SDK attributes events for each notification clicked or viewed. Events are attributed on the basis of time interval specified for all log events.
Currently, click through attribution works for push notification clicked (sent via QGraph) and InApp notification clicked. View through attribution works only in the case of InApp notifications.
By default click through attribution window (time interval) is set to 86400 seconds (24 hrs) and view through attribution window is set to 3600 seconds (1 hr). You can change this window any time using following apis:
// to set click through attribution window
- (void)setClickAttributionWindow:(NSInteger)seconds;
// to set view through attribution window
- (void)setAttributionWindow:(NSInteger)seconds;
To set a custom value, pass the time interval in seconds. e.g.: to set click attribution window to be 12 hrs:
[[QGSdk getSharedInstance] setClickAttributionWindow:43200];
To disable any of the click through or view through attribution, pass the value 0. E.g.:
[[QGSdk getSharedInstance] setAttributionWindow:0];
Configuring Batching
Our SDK batches the network requests it makes to QGraph server, in order to optimize network usage. By default, it flushes data to the server every 15 seconds in release builds, and every second in debug builds. This interval is configurable using the following method:
[[QGSdk getSharedInstance] setFlushInterval:<flush interval in seconds>];
Further, you can force the SDK to flush the data to server any time by calling the following function:
[[QGSdk getSharedInstance] flush];
Furthermore, you can invoke a completion handler after flush using function:
[[QGSdk getSharedInstance] flushWithCompletion:^{
   //some method
}];
Matching mobile app users with mobile web users
Our SDK can help you track your mobile app users across your app and mobile web. If you want to enable this functionality, you need to add Safari Services Framework in your app.
If you have added Safari Services Framework in your app, but would like to disable our tracking, use the following function:
[[QGSdk getSharedInstance] disableUserTrackingForSafari];
In app Notification
QGraph SDK supports InApp notification starting in sdk version 2.0.0. InApp notification are supported in two types: Textual and Image. Visit your QGraph account to create InApp Campaigns.
These notifications are shown based on the log events app sends through our sdk and the matching conditions of the InApp Campaigns. Make sure to send appropriate log event (with parameter or valueToSum if any) for InApp notifications to work.
By default, InApp notifications are enabled. You can enable/disable it anytime using following method in the sdk:
- (void)disableInAppCampaigns:(BOOL)disabled;
eg. to disable:
[[QGSdk getSharedInstance] disableInAppCampaigns:YES];
Disabling it will restrict the device to get any new InApp campaigns. It will also disable InApp notification to be drawn.
For All InApp Notification, you can configure a deep link url from the dashboard while creating an InApp campaign.
There is tap event defined on textual and image InApps. When the user taps on text on textual InApp or clicks on image in the image InApp and if there is a valid deep link setup, you will get a call back in your AppDelegate.m in the following method:
- (BOOL)application:(UIApplication *)app openURL:(NSURL *)url options:(NSDictionary<NSString *,id> *)options;
or:
- (BOOL)application:(UIApplication *)application openURL:(NSURL *)url sourceApplication:(nullable NSString *)sourceApplication annotation:(id)annotation; (Deprecated in iOS_9)
Here you can implement your deep link with the url.
Registering Your Actionable Notification Types
Actionable notifications let you add custom action buttons to the standard iOS interfaces for local and push notifications. Actionable notifications give the user a quick and easy way to perform relevant tasks in response to a notification. Prior to iOS 8, user notifications had only one default action. In iOS 8 and later, the lock screen, notification banners, and notification entries in Notification Center can display one or two custom actions. Modal alerts can display up to four. When the user selects a custom action, iOS notifies your app so that you can perform the task associated with that action.
For defining a notification action and its category, and to handle actionable notification, please refer the description in the apple docs. (Click here)
Action Category can be set in the dashboard while sending notification. While configuring to send notification through campaigns, use the categories defined in the app.
Logging user profile information
User profiles are information about your users, like their name, city, date of birth or any other information that you may wish to track. You log user profiles by using one or more of the following functions:
- (void)setUserId:(NSString *)userId;
Other methods you may use to pass user profile prameters to us:
- (void)setUserId:(NSString *)userId;
- (void)setName:(NSString *)name;
- (void)setFirstName:(NSString *)name;
- (void)setLastName:(NSString *)name;
- (void)setCity:(NSString *)city;
- (void)setEmail:(NSString *)email;
- (void)setDayOfBirth:(NSNumber *)day;
- (void)setMonthOfBirth:(NSNumber *)month;
- (void)setYearOfBirth:(NSNumber *)year;
Other than these method, you can log your own custom user parameters. You do it using:
- (void)setCustomKey:(NSString *)key withValue:(id)value;
For example, you may wish to have the user’s current rating like this:
[[QGSdk getSharedInstance] setCustomKey:@"current rating" withValue:@"123"];
Logging events information
Events are the activities that a user performs in your app, for example, viewing the products, playing a game or listening to a music. Each event has follow properties:
- Name. For instance, the event of viewing a product is called
product_viewed - Optionally, some parameters. For instance, for event
product_viewed, the parameters areid(the id of the product viewed),name(name of the product viewed),image_url(image url of the product viewed),deep_link(a deep link which takes one to the product page in the app), and so on. - Optionally, a “value to sum”. This value will be summed up when doing campaing attribution. For instance, if you pass this value in your checkout completed event, you will be able to view stats such as a particular campaign has been responsible to drive Rs 84,000 worth of sales.
- Optionally, the currency of value to sum. Currency needs to be a 3 digit code A currency, as described in this page.
You log events using the function logEvent(). It comes in four variations
(void)logEvent:(NSString *)name(void)logEvent:(NSString *)name withParameters:(NSDictionary *)parameters(void)logEvent:(NSString *)name withParameters:(NSDictionary *)parameterswithValueToSum:(NSNumber *) valueToSum(void)logEvent:(NSString *)name withParameters:(NSDictionary *)parameterswithValueToSum:(NSNumber *) valueToSum withValueToSumCurrency:(NSString *)vtsCurr
Once you log event information to use, you can segment users on the basis of the events (For example, you can create a segment consisting of users have not launched for past 7 days, or you can create a segment consiting of users who, in last 7 days, have purchased a product whose value is more than $1000)
You can also define your events, and your own parameters for any event. However, if you do that, you will need to sync up with us to be able to segment the users on the basis of these events or customize your creatives based on these events.
You can use the following method to pass event information to us:
- (void)logEvent:(NSString *)name withParameters:(NSDictionary *)parameters;
Here is how you set up some of the popular events.
Registration Completed
This event does not have any parameters:
[[QGSdk getSharedInstance] logEvent:@"registration_completed" withParameters:nil];
Category Viewed
This event has one paraemter:
NSMutableDictionary *categoryDetails = [[NSMutableDictionary alloc] init];
[CategoryDetails setObject:@"apparels" forKey: @"category"];

[[QGSdk getSharedInstance] logEvent:@"category_viewed" withParameters:categoryDetails];
Product Viewed
You may choose to have the following fields:
NSMutableDictionary *productDetails = [[NSMutableDictionary alloc] init];
[productDetails setObject:@"123" forKey:@"id"];
[productDetails setObject:@"Nikon Camera" forKey:@"name"];
[productDetails setObject:@"http://mysite.com/products/123.png" forKey:@"image_url"];
[productDetails setObject:@"myapp//products?id=123" forKey:@"deep_link"];
[productDetails setObject:@"black" forKey:@"color"];
[productDetails setObject:@"electronics" forKey:@"category"];
[productDetails setObject:@"small" forKey:@"size"];
[productDetails setObject:@"6999" forKey:@"price"];
[[QGSdk getSharedInstance] logEvent:@"product_viewed" withParameters:productDetails];
Product Added to Wishlist:
NSMutableDictionary *productDetails = [[NSMutableDictionary alloc] init];
[productDetails setObject:@"123" forKey:@"id"];
[productDetails setObject:@"Nikon Camera" forKey:@"name"];
[productDetails setObject:@"http://mysite.com/products/123.png" forKey:@"image_url"];
[productDetails setObject:@"myapp//products?id=123" forKey:@"deep_link"];
[productDetails setObject:@"black" forKey:@"color"];
[productDetails setObject:@"electronics" forKey:@"category"];
[prdouctDetails setObject:@"Nikon" forKey:@"brand"];
[productDetails setObject:@"small" forKey:@"size"];
[productDetails setObject:@"6999" forKey:@"price"];
[[QGSdk getSharedInstance] logEvent:@"product_added_to_wishlist" withParameters:productDetails];
Product Purchased:
NSMutableDictionary *productDetails = [[NSMutableDictionary alloc] init];
[productDetails setObject:@"123" forKey:@"id"];
[productDetails setObject:@"Nikon Camera" forKey:@"name"];
[productDetails setObject:@"http://mysite.com/products/123.png" forKey:@"image_url"];
[productDetails setObject:@"myapp//products?id=123" forKey:@"deep_link"];
[productDetails setObject:@"black" forKey:@"color"];
[productDetails setObject:@"electronics" forKey:@"category"];
[productDetails setObject:@"small" forKey:@"size"];
[productDetails setObject:@"6999" forKey:@"price"];
and then:
[[QGSdk getSharedInstance] logEvent:@"product_purchased" withParameters:productDetails];
or:
[[QGSdk getSharedInstance] logEvent:@"product_purchased" withParameters:productDetails withValueToSum price];
Checkout Initiated:
NSMutableDictionary *checkoutDetails = [[NSMutableDictionary alloc] init];
[checkoutDetails setObject:@"2" forKey:@"num_products"];
[checkoutDetails setObject:@"12998.44" forKey:@"cart_value"];
[checkoutDetails setObject:@"myapp://myapp/cart" forKey:@"deep_link"];
[[QGSdk getSharedInstance] logEvent:@"checkout_initiated" withParameters:checkoutDetails];
Product Rated:
NSMutableDictionary *productRated = [[NSMutableDictionary alloc] init];

[productRated setObject:@"1232" forKey:@"id"];
[productRated setObject:@"2" forKey:@"rating"];
[[QGSdk getSharedInstance] logEvent:@"product_rated" withParameters:productRated];
Searched:
NSMutableDictionary *searchDetails = [[NSMutableDictionary alloc] init];
[searchDetails setObject:@"1232" forKey:@"id"];
[searchDetails setObject:@"Nikon Camera" forKey:@"name"];
[[QGSdk getSharedInstance] logEvent:@"searched" withParameters:searched];
Reached Level:
NSMutableDictionary *level = [[NSMutableDictionary alloc] init];
[level setObject:@"23" forKey:@"level"];
[[QGSdk getSharedInstance] logEvent:@"level" withParameters:level];
Your custom events
Apart from above predefined events, you can create your own custom events, and have custom parameters in them:
NSMutableDictionary *event = [[NSMutableDictionary alloc] init];
[event setObject:@"2" forKey:@"num_products"];
[event setObject:@"some_value" forKey:@"my_param"];
[event setObject:@"123" forKey:@"some_other_param"];
[[QGSdk getSharedInstance] logEvent:@"my_custom_event" withParameters:event];
Using iOS SDK - Swift (3.0)
Change required for APNS Token and User Tracking
It is required by QG SDK that you enable Background Mode in the Capabilities section of the main app target. After enabling background modes, select Remote Notification as shown in the snapshot.
Adding bridging headers
In Xcode, create the header file and name it by your product module name followed by
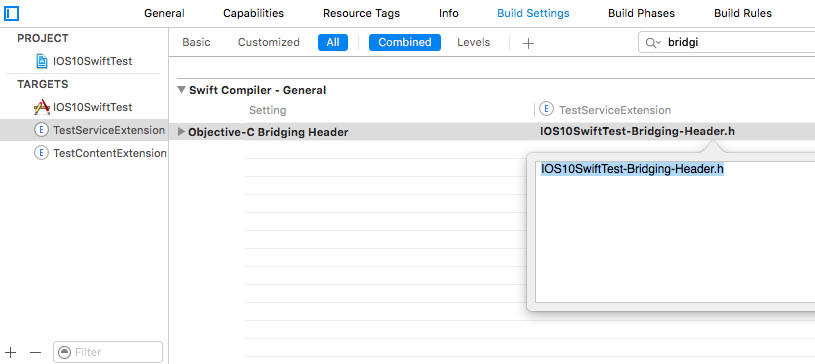
adding-Bridging-Header.h. File name should look likeProject_Name-Bridging-Header.h. Please make sure this header file is in root path of the project (although you can keep it anywhere).Now Click on project tab to open Build Settings. In your project target -> Build Setting, search for
Objective-C Bridging Headerand add path of theProject_Name-Bridging-Header.h. (Project_Name/Project_Name-Bridging-Header.h)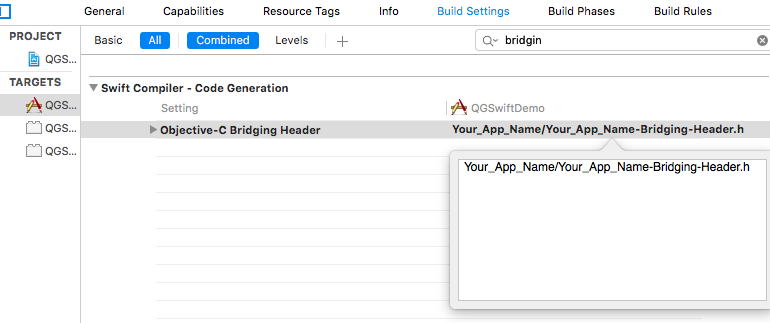
Import SDK header file in the bridging header file. Your file should look like this:
#ifndef Project_Name_Bridging_Header_h
#define Project_Name_Bridging_Header_h
#import "QGSdk.h"
#endif /* Project_Name_Bridging_Header_h */
App Delegate Changes
In didFinishLaunchingWithOptions method of AppDelegate, initialise the sdk using onStart() method add the following code for registering for remote notification:
NOTE: Add UserNotifications.framework and import UserNotifications in AppDelegate for iOS 10 notification.
Also add UNUserNotificationCenterDelegate in AppDelegate. iOS 10 implementation is documented below:
func application(_ application: UIApplication, didFinishLaunchingWithOptions launchOptions: [UIApplicationLaunchOptionsKey: Any]?) -> Bool {
   let QG = QGSdk.getSharedInstance()
   QG?.onStart("<your_app_id>", setDevProfile: true)

   let settings = UIUserNotificationSettings(types: [.alert, .badge, .sound], categories: nil)
   UIApplication.shared.registerUserNotificationSettings(settings)

   return true
}
Note that UIApplication.shared.registerForRemoteNotifications() is called by our SDK for iOS 8 and above to track APNs Token for user tracking.
Just build and run the app to make sure that you receive a message that app would like to send push notification. If you get code signing error, make sure that proper provisioning profile is selected Add the following code in AppDelegate.m to get the device token for the user:
func application(_ application: UIApplication, didRegisterForRemoteNotificationsWithDeviceToken deviceToken: Data) {
   let QG = QGSdk.getSharedInstance()
   print("My token is: \(deviceToken.description)")
   QG?.setToken(deviceToken as Data!)
}

 func application(_ application: UIApplication, didFailToRegisterForRemoteNotificationsWithError error: Error) {
   print("Failed to get token, error: %@", error.localizedDescription)
 }
Handling Push Notification
Notifications are delivered while the app is in foreground, background or not running state. We can handle them in the following delegate methods.
If the remote notification is tapped, the system launches the app and the app calls its delgate’s didFinishLaunchingWithOptions: method, passing in the notification payload (for remote notifications). Although didFinishLaunchingWithOptions: is not the best place to handle the notification, getting the payload at this point gives you the opportunity to start the update process before your handler method is called.
For remote notifications, the system also calls the didReceiveRemoteNotification:fetchCompletionHandler: method of the app delegate.
The notification is delivered when the app is running in the foreground. The app calls the application:didReceiveRemoteNotification:fetchCompletionHandler: method of the app delegate. This method is called if the app is running in background or suspended state. (If application:didReceiveRemoteNotification:fetchCompletionHandler: is not implemented, the system calls application:didReceiveRemoteNotification:.) However, it is advised to use application:didReceiveRemoteNotification:fetchCompletionHandler: method to handle push notification.
Implementation:
func application(_ application: UIApplication, didReceiveRemoteNotification userInfo: [AnyHashable : Any], fetchCompletionHandler completionHandler: @escaping (UIBackgroundFetchResult) -> Void) {
   let QG = QGSdk.getSharedInstance()
   // to enable track click on notification
   QG?.application(application, didReceiveRemoteNotification: userInfo)
   completionHandler(UIBackgroundFetchResult.noData)
}
You can also handle background operation using the above method once remote notification is delivered. For this make sure, wake app in background is selected while creating a campaign to send the notification. Also, enable BACKGROUND MODE in capabilities and select Remote Notification.
If you have implemented application:didReceiveRemoteNotification: add method QGSdk.getSharedInstance().application(application, didReceiveRemoteNotification: userInfo) inside it. Your implementation should look like:
func application(_ application: UIApplication, didReceiveRemoteNotification userInfo: [AnyHashable : Any]) {
   let QG = QGSdk.getSharedInstance()
   // to enable track click on notification
   QG?.application(application, didReceiveRemoteNotification: userInfo)
}
Changes for iOS 10
Your basic integration for iOS 8 and 9 is complete. From iOS 10 and above two new frameworks has been introduced for notifications. For integrating QGraph notification SDK, you need to add Capabilities APP GROUPS. Go to Project > Main Target > Capabilities. Check on App Groups and add a group as below. Use your bundle id to create App Group. For example, if your bundle id is com.company.appname, App Group could be group.com.company.appname.xyz.

You need App Group so that data can be shared between extensions. Use that App Group name in onStart:withAppGroup:setDevProfile: in App Delegate.
AppDelegate Changes for Swift Apps for iOS 10
Add framework UserNotifications to app target and import in app delegate. Also add UNUserNotificationCenterDelegate in it:
import UIKit
import UserNotifications

@UIApplicationMain
class AppDelegate: UIResponder, UIApplicationDelegate, UNUserNotificationCenterDelegate {

    var window: UIWindow?

    let APP_GROUP = “group.com.company.product.extension”

    func application(_ application: UIApplication, didFinishLaunchingWithOptions launchOptions: [UIApplicationLaunchOptionsKey: Any]?) -> Bool {
        // Override point for customization after application launch.

        let QG = QGSdk.getSharedInstance()
        QG?.onStart(“<your_app_id>”, withAppGroup: APP_GROUP, setDevProfile: true)

        if #available(iOS 10.0, *) {
            let center = UNUserNotificationCenter.current()
            center.delegate = self

            // adding category for QGraph Carousel and Slider Push
            let categories = NSSet(object: QG!.getQGSliderPushActionCategory(withNextButtonTitle: nil, withOpenAppButtonTitle: nil)) as! Set<UNNotificationCategory>
            center.setNotificationCategories(categories)

            center.requestAuthorization(options: [.badge, .carPlay, .alert, .sound]) { (granted, error) in
                print("Granted: \(granted), Error: \(error)")
            }

        } else {
            // Fallback on earlier versions
            let settings = UIUserNotificationSettings(types: [.alert, .badge, .sound], categories: nil)
            UIApplication.shared.registerUserNotificationSettings(settings)
        }

        return true
    }

}
NOTE: If you have your own existing notification action category for iOS 10, you can add it along with QGraph CAROUSEL/SLIDER category. For the carousel and slider push action buttons, you can also specify button titles. Next button will be used to animate the carousel/slider and Open App Button will open the app with deeplink if any.
Handling Push Notification in iOS 10
There are new delegate methods introduced in iOS 10 to track notification and display in foreground state as well. To track notifications in background state, you need to enable background mode in the capabilities. Above all these you need to activate push notification in the capabilities. This will add entitlement files to your app target.
You might have already included this method. Please make sure
QGSdk.getSharedInstance().application(application, didReceiveRemoteNotification: userInfo)is added in it. It is required to track notifications:func application(_ application: UIApplication, didReceiveRemoteNotification userInfo: [AnyHashable : Any], fetchCompletionHandler completionHandler: @escaping (UIBackgroundFetchResult) -> Void) { let QG = QGSdk.getSharedInstance() // to enable track click on notification QG?.application(application, didReceiveRemoteNotification: userInfo) completionHandler(UIBackgroundFetchResult.noData) }The below method will be called on the delegate only if the application is in the foreground. If the method is not implemented or the handler is not called in a timely manner then the notification will not be presented. The application can choose to have the notification presented as a sound, badge, alert and/or in the notification list. This decision should be based on whether the information in the notification is otherwise visible to the user:
@available(iOS 10.0, *) func userNotificationCenter(_ center: UNUserNotificationCenter, willPresent notification: UNNotification, withCompletionHandler completionHandler: @escaping (UNNotificationPresentationOptions) -> Void) { QGSdk.getSharedInstance().userNotificationCenter(center, willPresent: notification) completionHandler([.alert, .badge, .sound]); }
The method will be called on the delegate when the user responded to the notification by opening the application, dismissing the notification or choosing a UNNotificationAction. The delegate must be set before the application returns from
applicationDidFinishLaunching:.
NOTE: This method is specifically required for carousel and slider push to work. Also used to track notification_clicked event for QGraph push:
@available(iOS 10.0, *)
func userNotificationCenter(_ center: UNUserNotificationCenter, didReceive response: UNNotificationResponse, withCompletionHandler completionHandler: @escaping () -> Void) {
QGSdk.getSharedInstance().userNotificationCenter(center, didReceive: response)
completionHandler()
}
Handling Deeplink for QGraph Push
For Push notifications deeplinks should be handled in the method didReceiveNotificationResponse:withCompletionHandler: as described below. You can get the deeplink url and then pass it to openUrl: and then you should get a callback in the application:openUrl:options where you can handle the opening of a specific page.
@available(iOS 10.0, *)
func userNotificationCenter(_ center: UNUserNotificationCenter, didReceive response: UNNotificationResponse, withCompletionHandler completionHandler: @escaping () -> Void) {
let userInfo = response.notification.request.content.userInfo
if (userInfo["deepLink"] != nil) {
let url = URL.init(string: userInfo["deepLink"] as! String)
DispatchQueue.main.async {
UIApplication.shared.openURL(url!)
}
}
QGSdk.getSharedInstance().userNotificationCenter(center, didReceive: response)
completionHandler()
}
For any deeplink specified in In-App campaigns, you should get a callback in the below method. You need to handle it on your own to open any specific page.
func application(_ app: UIApplication, open url: URL, options: [UIApplicationOpenURLOptionsKey : Any] = [:]) -> Bool {
print("deeplink called")
return true
}
Finally, after adding all the above methods your app delegate should look like:
import UIKit
import UserNotifications
@UIApplicationMain
class AppDelegate: UIResponder, UIApplicationDelegate, UNUserNotificationCenterDelegate {
var window: UIWindow?
let APP_GROUP = “group.com.company.product.extension”
func application(_ application: UIApplication, didFinishLaunchingWithOptions launchOptions: [UIApplicationLaunchOptionsKey: Any]?) -> Bool {
// Override point for customization after application launch.
let QG = QGSdk.getSharedInstance()
QG?.onStart(“<your_app_id>”, withAppGroup: APP_GROUP, setDevProfile: true)
if #available(iOS 10.0, *) {
let center = UNUserNotificationCenter.current()
center.delegate = self
let categories = NSSet(object: QG!.getQGSliderPushActionCategory(withNextButtonTitle: nil, withOpenAppButtonTitle: nil)) as! Set<UNNotificationCategory>
center.setNotificationCategories(categories)
center.requestAuthorization(options: [.badge, .carPlay, .alert, .sound]) { (granted, error) in
print("Granted: \(granted), Error: \(error)")
}
} else {
// Fallback on earlier versions
let settings = UIUserNotificationSettings(types: [.alert, .badge, .sound], categories: nil)
UIApplication.shared.registerUserNotificationSettings(settings)
}
return true
}
func application(_ application: UIApplication, didRegisterForRemoteNotificationsWithDeviceToken deviceToken: Data) {
let QG = QGSdk.getSharedInstance()
print("My token is: \(deviceToken.description)")
QG?.setToken(deviceToken as Data!)
}
func application(_ application: UIApplication, didFailToRegisterForRemoteNotificationsWithError error: Error) {
print("Failed to get token, error: %@", error.localizedDescription)
}
func application(_ application: UIApplication, didReceiveRemoteNotification userInfo: [AnyHashable : Any], fetchCompletionHandler completionHandler: @escaping (UIBackgroundFetchResult) -> Void) {
   let QG = QGSdk.getSharedInstance()
   // to enable track click on notification
   QG?.application(application, didReceiveRemoteNotification: userInfo)
   completionHandler(UIBackgroundFetchResult.noData)
}
@available(iOS 10.0, *)
func userNotificationCenter(_ center: UNUserNotificationCenter, didReceive response: UNNotificationResponse, withCompletionHandler completionHandler: @escaping () -> Void) {
QGSdk.getSharedInstance().userNotificationCenter(center, didReceive: response)
completionHandler()
}
@available(iOS 10.0, *)
func userNotificationCenter(_ center: UNUserNotificationCenter, willPresent notification: UNNotification, withCompletionHandler completionHandler: @escaping (UNNotificationPresentationOptions) -> Void) {
   QGSdk.getSharedInstance().userNotificationCenter(center, willPresent: notification)
   completionHandler([.alert, .badge, .sound]);
}
func application(_ app: UIApplication, open url: URL, options: [UIApplicationOpenURLOptionsKey : Any] = [:]) -> Bool {
   print("deeplink called")
   return true
}
}
Adding Extensions for iOS Push with Attachment and QGraph Carousel and Slider Push
In iOS 10, two frameworks has been introduced for handling push notification with content. You can have a push notification with image, gif, audio and video. Apart from that you can also have your custom UI for notifications. For this, payload can be modified and used to download content before the notification is drawn. You simply need to follow the below steps to add two of the extensions targets for handling these notifications: Service Extension and Content Extension. Before proceeding make sure to download all the QGraph files to be used here. You should have these files with you
- QGNotificationSdk
- QGNotificationServiceExtension
- QGNotificationContentExtension
NOTE: These files are to be used with service and content extensions only. Do not add them to main app target.
Notification Service Extension
Service extension is basically the target extension where you get a callback when a push is delivered to the device. You can download and create attachments here. If you fail to download the content and pass it to contentHandler within certain time, default standard notification will be drawn.
Adding Service extension
Add an iOS target and choose Notification Service extension and proceed. Add a product name and Finish. When created you will be prompted to activate the target. Once activated, you can see 2 files added, NotificationService.swift and Info.plist in the created target.

Delete the NotificationService.swift file from the service extension target.
Add file NotificationService.swift from downloaded folder QGNotificationServiceExtension
Go to project navigator and select the Service Extension Target
Select Capabilities and check on App Group and select the APP GROUP which you added to your main app target.
Go to NotificationService.swift and change your app group:
let APP_GROUP = "group.com.company.product.extension"
Adding Content Extension
Add an iOS target and choose Notification Content extension and proceed. Add a product name and Finish. When created you will be prompted to activate the target. Once activated, you can see 3 files added, NotificationViewController.swift, MainInterface.storyboard and Info.plist.

Delete NotificationViewController.swift and MainInterface.storyboard.
Add files NotificationViewController.swift and MainInterface.storyboard from downloaded folder QGNotificationContentExtension.
As done above, enable App Groups and select the same app group through capabilities of the content extension target.
Go to NotificationViewController.m and change your app group:
let APP_GROUP = "group.com.company.product.extension"
Go to Info.plist and add UNNotificationExtensionDefaultContentHidden (Boolean) - YES and UNNotificationExtensionCategory (string) - QGCAROUSEL in NSExtensionAttributes dict of NSExtension dict as shown in the screenshot.

Add QuartzCore.framework in this target.
Add QGNotificationSdk to both extension targets. Do not add it to main app target.
NOTE:
- Please make sure APP_GROUP used in all the three targets are same.
- Set the deployment target to 10.0 in both the extensions.
- Remove -ObjC/$(inherited) (if it exists) from build settings of service and content extension targets.
IMP: You need to add QGNotificationSdk.h and iCarousel.h in Bridging-Header, so that these objective C files can be used in your extension targets.
Go to Project -> Extension Targets -> Build Setting -> Objective-C Bridging Header
Add the path to your bridging-header-file similar to Main App Target.
Note: Add bridging-header-file in any one of the extensions (service extension or content extension) and then add the file path of bridging header in both the extensions.
Click Through and View Through Attribution
QGraph SDK attributes events for each notification clicked or viewed. Events are attributed on the basis of time interval specified for all log events.
Currently, click through attribution works for push notification clicked (sent via QGraph) and InApp notification clicked. View through attribution works only in the case of InApp notifications.
By default click through attribution window (time interval) is set to 86400 seconds (24 hrs) and view through attribution window is set to 3600 seconds (1 hr). You can change this window any time using following apis:
// to set click through attribution window
- (void)setClickAttributionWindow:(NSInteger)seconds;
// to set view through attribution window
- (void)setAttributionWindow:(NSInteger)seconds;
To set a custom value, pass the time interval in seconds. e.g.: to set click attribution window to be 12 hrs:
QGSdk.getSharedInstance().setClickAttributionWindow(43200)
To disable any of the click through or view through attribution, pass the value 0. E.g.:
QGSdk.getSharedInstance().setAttributionWindow(0)
Configuring Batching
Our SDK batches the network requests it makes to QGraph server, in order to optimize network usage. By default, it flushes data to the server every 15 seconds in release builds, and every second in debug builds. This interval is configurable using the following method:
QGSdk.getSharedInstance().flushInterval = <flush interval in seconds>
Further, you can force the SDK to flush the data to server any time by calling the following function:
QGSdk.getSharedInstance().flush()
Furthermore, you can invoke a completion handler after flush using function:
QGSdk.getSharedInstance().flush(completion: {
    //some method
})
Matching mobile app users with mobile web users
Our SDK can help you track your mobile app users across your app and mobile web. If you want to enable this functionality, you need to add Safari Services Framework in your app.
If you have added Safari Services Framework in your app, but would like to disable our tracking, use the following function:
QGSdk.getSharedInstance().disableUserTrackingForSafari()
In app Notification
QGraph SDK supports InApp notification starting in sdk version 2.0.0. InApp notification are supported in two types: Textual and Image. Visit your QGraph account to create InApp Campaigns.
These notifications are shown based on the log events app sends through our sdk and the matching conditions of the InApp Campaigns. Make sure to send appropriate log event (with parameter or valueToSum if any) for InApp notifications to work.
By default, InApp notifications are enabled. You can enable/disable it anytime using following method in the sdk:
- (void)disableInAppCampaigns:(BOOL)disabled;
eg. to disable:
QGSdk.getSharedInstance().disable(inAppCampaigns: true)
Disabling it will restrict the device to get any new InApp campaigns. It will also disable InApp notification to be drawn.
For All InApp Notification, you can configure a deep link url from the dashboard while creating an InApp campaign.
There is tap event defined on textual and image InApps. When the user taps on text on textual InApp or clicks on image in the image InApp and if there is a valid deep link setup, you will get a call back in your AppDelegate.m in the following method:
func application(_ app: UIApplication, open url: URL, options: [UIApplicationOpenURLOptionsKey : Any] = [:]) -> Bool
Here you can implement your deep link with the url.
Registering Your Actionable Notification Types
Actionable notifications let you add custom action buttons to the standard iOS interfaces for local and push notifications. Actionable notifications give the user a quick and easy way to perform relevant tasks in response to a notification. Prior to iOS 8, user notifications had only one default action. In iOS 8 and later, the lock screen, notification banners, and notification entries in Notification Center can display one or two custom actions. Modal alerts can display up to four. When the user selects a custom action, iOS notifies your app so that you can perform the task associated with that action.
For defining a notification action and its category, and to handle actionable notification, please refer the description in the apple docs. (please click here)
Action Category can be set in the dashboard while sending notification. While configuring to send notification through campaigns, use the categories defined in the app.
Logging user profile information
User profiles are information about your users, like their name, city, date of birth or any other information that you may wish to track. You log user profiles by using one or more of the following functions:
- (void)setUserId:(NSString *)userId;
Other methods you may use to pass user profile prameters to us:
- (void)setUserId:(NSString *)userId;
- (void)setName:(NSString *)name;
- (void)setFirstName:(NSString *)name;
- (void)setLastName:(NSString *)name;
- (void)setCity:(NSString *)city;
- (void)setEmail:(NSString *)email;
- (void)setDayOfBirth:(NSNumber *)day;
- (void)setMonthOfBirth:(NSNumber *)month;
- (void)setYearOfBirth:(NSNumber *)year;
Other than these method, you can log your own custom user parameters. You do it using:
- (void)setCustomKey:(NSString *)key withValue:(id)value;
For example, you may wish to have the user’s current rating like this:
QGSdk.getSharedInstance().setCustomKey("current rating", withValue: "123")
Logging events information
Events are the activities that a user performs in your app, for example, viewing the products, playing a game or listening to a music. Each event has follow properties:
- Name. For instance, the event of viewing a product is called product_viewed.
- Optionally, some parameters. For instance, for event product_viewed, the parameters are id(the id of the product viewed), name (name of the product viewed), image_url (image url of the product viewed), deep_link (a deep link which takes one to the product page in the app), and so on.
3. Optionally, a “value to sum”. This value will be summed up when doing campaing attribution. For instance, if you pass this value in your checkout completed event, you will be able to view stats such as a particular campaign has been responsible to drive Rs 84,000 worth of sales.
You log events using the function logEvent(). It comes in four variations.
(void)logEvent:(NSString *)name

(void)logEvent:(NSString *)name withParameters:(NSDictionary *)parameters

(void)logEvent:(NSString *)name withValueToSum:(NSNumber *) valueToSum

(void)logEvent:(NSString *)name withParameters:(NSDictionary *)parameters withValueToSum:(NSNumber *) valueToSum
Once you log event information to use, you can segment users on the basis of the events (For example, you can create a segment consisting of users have not launched for past 7 days, or you can create a segment consiting of users who, in last 7 days, have purchased a product whose value is more than $1000)
You can also define your events, and your own parameters for any event. However, if you do that, you will need to sync up with us to be able to segment the users on the basis of these events or customize your creatives based on these events.
You can use the following method to pass event information to us:
- (void)logEvent:(NSString *)name withParameters:(NSDictionary *)parameters;
Here is how you set up some of the popular events.
Registration Completed
This event does not have any parameters:
QGSdk.getSharedInstance().logEvent("registration_completed", withParameters: nil)
Category Viewed
This event has one parameter:
let categoryDetails = ["category": "apparels"]
QGSdk.getSharedInstance().logEvent("category_viewed", withParameters: categoryDetails)
Product Viewed
You may choose to have the following fields:
var productDetails : [String:String] = [:]
productDetails["id"] = "123"
productDetails["name"] = "Nikon Camera"
productDetails["image_url"] = "http://mysite.com/products/123.png"
productDetails["deep_link"] = "myapp://products?id=123"
productDetails["color"] = "black"
productDetails["category"] = "electronics"
productDetails["size"] = "small"
productDetails["price"] = "6999"
QGSdk.getSharedInstance().logEvent("product_viewed", withParameters: productDetails)
Product Added to Wishlist
var productDetails : [String:String] = [:]
productDetails["id"] = "123"
productDetails["name"] = "Nikon Camera"
productDetails["image_url"] = "http://mysite.com/products/123.png"
productDetails["deep_link"] = "myapp://products?id=123"
productDetails["color"] = "black"
productDetails["category"] = "electronics"
productDetails["size"] = "small"
productDetails["price"] = "6999"
QGSdk.getSharedInstance().logEvent("product_added_to_wishlist", withParameters: productDetails)
Product Purchased
var productDetails : [String:String] = [:]
productDetails["id"] = "123"
productDetails["name"] = "Nikon Camera"
productDetails["image_url"] = "http://mysite.com/products/123.png"
productDetails["deep_link"] = "myapp://products?id=123"
productDetails["color"] = "black"
productDetails["category"] = "electronics"
productDetails["size"] = "small"
productDetails["price"] = "6999"
and then:
QGSdk.getSharedInstance().logEvent("product_purchased”, withParameters: productDetails)
or:
QGSdk.getSharedInstance().logEvent("product_purchased", withParameters: productDetails, withValueToSum: price)
Checkout Initiated
var checkoutDetails : [String:String] = [:]
checkoutDetails["num_products"] = "2"
checkoutDetails["cart_value"] = "12998.44"
checkoutDetails["deep_link"] = "myapp://myapp/cart"
QGSdk.getSharedInstance().logEvent("checkout_initiated", withParameters: checkoutDetails)
Product Rated
var productRated : [String:String] = [:]
productRated["id"] = "1232"
productRated["rating"] = "2"
QGSdk.getSharedInstance().logEvent("product_rated", withParameters: productRated)
Searched
var searchDetails : [String:String] = [:]
searchDetails["id"] = "1232"
searchDetails["name"] = "2"
QGSdk.getSharedInstance().logEvent(“searched”, withParameters: searchDetails)
Reached Level
let level = ["level" : "23"]
QGSdk.getSharedInstance().logEvent("level", withParameters: level)
Your custom events
Apart from above predefined events, you can create your own custom events, and have custom parameters in them:
var event : [String:String] = [:]
event["num_products"] = "2"
event["my_param"] = "some_value"
event["some_other_param"] = "123"
QGSdk.getSharedInstance().logEvent("my_custom_event", withParameters: event)