Android SDK integration
Installation in Android Studio
A. If you use FCM
Add dependencies to app/build.gradle:
compile "com.quantumgraph.sdk:QG:5.2.0"
compile 'com.google.firebase:firebase-messaging:11.2.2'
If you have implemented FirebaseMessagingService in your project add the following code inside onMessageReceived(RemoteMessage remoteMessage) method:
String from = remoteMessage.getFrom();
Map data = remoteMessage.getData();
if (data.containsKey("message") && QG.isQGMessage(data.get("message").toString())) {
      Bundle qgData = new Bundle();
      qgData.putString("message", data.get("message").toString());
      Context context = getApplicationContext();
      if (from == null || context == null) {
          return;
      }
      Intent intent = new Intent(context, NotificationJobIntentService.class);
      intent.setAction("QG");
      intent.putExtras(qgData);
      JobIntentService.enqueueWork(context, NotificationJobIntentService.class, 1000, intent);
      return;
  }
If you have implemented FirebaseInstanceIdService, add the following code inside onTokenRefresh():
QG.logFcmId(getApplicationContext());
Additional settings:
If you would like to reach out to uninstalled users by email, add following line in app/src/main/AndroidManifest.xml outside the <application> tag:
<uses-permission android:name="android.permission.GET_ACCOUNTS" />
If you would like us to track the city of the user, add the following line in app/src/main/AndroidManifest.xml outside the <application> tag:
<uses-permission android:name="android.permission.ACCESS_COARSE_LOCATION" />
<uses-permission android:name="android.permission.ACCESS_FINE_LOCATION" />
If you would like us to track device id the user, add the following line in app/src/main/AndroidManifest.xml outside the <application> tag:
<uses-permission android:name="android.permission.READ_PHONE_STATE" />
Note
If while building your project, you get a ClassNotFoundException, check the following
- Check that you are using Support Library version 26 or above
compile 'com.android.support:appcompat-v7:26.0.1'
- Check that you have included maven properly in
project/build.gradle
allprojects {
  repositories {
    jcenter()
    maven {
      url "https://maven.google.com"
    }
  }
}
B. If you use GCM
We prefer that you integrate using FCM. However, if you are already using GCM (and have GCM tokens), follow the following steps
Add dependencies to app/build.gradle:
compile "com.quantumgraph.sdk:QG:2.3.5"
compile "com.google.android.gms:play-services-gcm:11.2.2"
Additional settings:
If you would like to reach out to uninstalled users by email, add following line in app/src/main/AndroidManifest.xml outside the <application> tag:
<uses-permission android:name="android.permission.GET_ACCOUNTS" />
If you would like us to track the city of the user, add the following line in app/src/main/AndroidManifest.xml outside the <application> tag:
<uses-permission android:name="android.permission.ACCESS_COARSE_LOCATION" />
<uses-permission android:name="android.permission.ACCESS_FINE_LOCATION" />
If you would like us to track device id the user, add the following line in app/src/main/AndroidManifest.xml outside the <application> tag:
<uses-permission android:name="android.permission.READ_PHONE_STATE" />
If you use your own service that extends
GCMListenerService, following code snippet must be added in your service:@Override public void onMessageReceived(String from, Bundle data) { if (data.containsKey("message") && QG.isQGMessage(data.getString("message"))) { Context context = getApplicationContext(); Intent intent = new Intent(context, NotificationJobIntentService.class); intent.setAction("QG"); intent.putExtras(data); JobIntentService.enqueueWork(context, NotificationJobIntentService.class, 1000, intent); return; } }
Installation in Cordova
QGraph supports apps built with Cordova. Please look at our github plugin for cordova here.
Using Android SDK
Follow these steps to use our android SDK
Import QG SDK in your activity
In all the activity classes, starting with the class for the main activity, import QG SDK:
import com.quantumgraph.sdk.QG;
Initialization of SDK
Define a variable called
qgin your activity:private QG qg;
Add a line in
onCreate()of your activity. If you do not use Firebase in your app, add the following:QG.initializeSdk(getApplication(), <your app id>);
If you use Firebase in your app, you need to know your sender id. In that case, add the following:
QG.initializeSdk(getApplication(), <your app id>, <your sender id>);
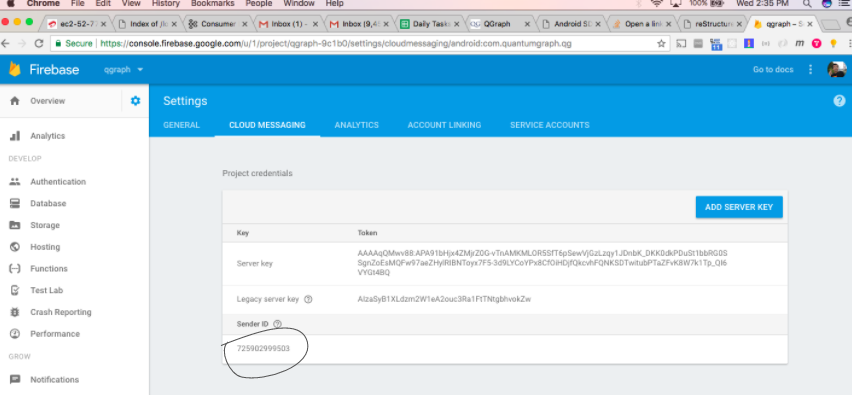
App id for your app is available from the settings page of our webapp. To get your sender id, go to your project settings in https://console.firebase.google.com. (You need to access “Cloud Messaging” tab in Firebase console).
In the
onStart()function of your activity, add the following:qg = QG.getInstance(getApplicationContext()); qg.onStart();
In case you want to enable GA integration via our SDK, add the following in your main activity’s
onCreate():qg.enableGATrackingWithGAID("<your GA id>"); Replace <your GA id> above with the GA id for your project.
Logging user profiles
User profiles are information about your users, like their name, city, date of birth or any other information that you may wish to track. You log user profiles by using one or more of the following functions:
qg.setUserId(String userId);
userId is the id of the user. It might be email, or username, or facebook id, or any other form of id that you may wish to keep.
Other functions that you may use are:
qg.setName(String name);
qg.setFirstName(String firstName);
qg.setLastName(String lastName);
qg.setCity(String city);
qg.setEmail(String email);
qg.setDayOfBirth(int day);
qg.setMonthOfBirth(int month);
qg.setYearOfBirth(int year);
qg.setPhoneNumber(String phoneNo);
Other than these functions, you can log your own custom user parameters. You do it using:
qg.setCustomUserParameter(String key, E value);
For instance, you may wish to have the user’s current rating like this:
qg.setCustomUserParameter("current_rating", 123);
As implied by the function definition, the value can be of any data type.
Once user profile is set, you can use this to create personalized messages (For example: “Hi John, exciting deals are available in Mountain View”), or to create user segments (For example you can create a segment of users who were born after 1990 and live in Mountain View)
Apart from above user profile parameters, you can log the UTM source through which the user installed the app, using the following functions:
qg.setUtmSource(String utmSource);
qg.setUtmMedium(String utmMedium);
qg.setUtmTerm(String utmTerm);
qg.setUtmContent(String utmContent);
qg.setUtmCampaign(String utmCampaign);
Logging events
Events are the activities that a user performs in your app, for example, viewing the products, playing a game or listening to a music. Each event has a name (for instance, the event of viewing a product can be called product_viewed), and can have some parameters. For instance,
for event product_viewed, the parameters can be id (the id of the product viewed), name (name of the product viewed), image_url (image url of the product viewed), deep_link (a deep link which takes one to the product page in the app), and so on.
Once you log event information to use, you can segment users on the basis of the events (For example, you can create a segment consisting of users have not launched for past 7 days, or you can create a segment consiting of users who, in last 7 days, have purchased a product whose value is more than $1000)
You can also define your events, and your own parameters for any event. However, if you do that, you will need to sync up with us to be able to segment the users on the basis of these events or customize your creatives based on these events.
You can optionally log a “value to sum” with an event. This value will be summed up when doing campaing attribution. For instance, if you pass this value in your checkout completed event, you will be able to view stats such as a particular campaign has been responsible to drive Rs 84,000 worth of sales. You can also optionally provide a currency code for the value to sum. Currency needs to be a 3 digit code A currency, as described in this page.
Thus, there are four variants of the function logEvent() which logs the event
logEvent(String eventName)logEvent(String eventName, JSONObject parameters)logEvent(String eventName, JSONObject parameters, double valueToSum)logEvent(String eventName, JSONObject parameters, double valueToSum, String valueToSumCurrency)
Here is how you set up some of the popular events.
Registration Completed
This event does not have any parameters:
QG qg = QG.getInstance(getApplicationContext());
JSONObject registrationDetails = new JSONObject();
try {
qg.logEvent("registration_completed", registrationDetails);
} catch (JSONException e) {
}
Category Viewed
This event has one paraemter:
QG qg = QG.getInstance(getApplicationContext());
JSONObject categoryDetails = new JSONObject();
try {
categoryDetails.put("category", "apparels");
} catch (JsonException e) {
}
qg.logEvent("category_viewed", categoryDetails);
Product Viewed
You may choose to have the following fields:
QG qg = QG.getInstance(getApplicationContext());
JSONObject productDetails = new JSONObject();
try {
productDetails.put("id", "123");
productDetails.put("name", "Nikon Camera");
productDetails.put("image_url", "http://mysite.com/products/123.png");
productDetails.put("deep_link", "myapp//products?id=123");
productDetails.put("type", "new");
productDetails.put("category", "electronics");
productDetails.put("brand", "Nikon");
productDetails.put("color", "white");
productDetails.put("size", "small");
productDetails.put("price", 6999);
} catch (JsonException e) {
}
qg.logEvent("product_viewed", productDetails);
Product Added to Cart:
QG qg = QG.getInstance(getApplicationContext());
JSONObject productDetails = new JSONObject();
try {
productDetails.put("id", "123");
productDetails.put("name", "Nikon Camera");
productDetails.put("image_url", "http://mysite.com/products/123.png");
productDetails.put("deep_link", "myapp//products?id=123");
productDetails.put("type", "new");
productDetails.put("category", "electronics");
productDetails.put("brand", "Nikon");
productDetails.put("color", "white");
productDetails.put("size", "small");
productDetails.put("price", 6999);
} catch (JsonException e) {
}
qg.logEvent("product_added_to_cart", productDetails);
Product Added to Wishlist:
QG qg = QG.getInstance(getApplicationContext());
JSONObject productDetails = new JSONObject();
try {
productDetails.put("id", "123");
productDetails.put("name", "Nikon Camera");
productDetails.put("image_url", "http://mysite.com/products/123.png");
productDetails.put("deep_link", "myapp//products?id=123");
productDetails.put("type", "new");
productDetails.put("category", "electronics");
productDetails.put("brand", "Nikon");
productDetails.put("color", "white");
productDetails.put("size", "small");
productDetails.put("price", 6999);
} catch (JsonException e) {
}
qg.logEvent("product_added_to_wishlist", productDetails);
Product Purchased:
QG qg = QG.getInstance(getApplicationContext());
JSONObject productDetails = new JSONObject();
try {
productDetails.put("id", "123");
productDetails.put("name", "Nikon Camera");
productDetails.put("image_url", "http://mysite.com/products/123.png");
productDetails.put("deep_link", "myapp//products?id=123");
productDetails.put("type", "new");
productDetails.put("category", "electronics");
productDetails.put("brand", "Nikon");
productDetails.put("color", "white");
productDetails.put("size", "small");
productDetails.put("price", 6999);
} catch (JsonException e) {
}
qg.logEvent("product_purchased", productDetails, 6999);
/* Or if you do not want to pass the third argument, you can simply write
qg.logEvent("product_purchased", productDetails);*/
Checkout Initiated:
QG qg = QG.getInstance(getApplicationContext());
JSONObject checkoutDetails = new JSONObject();
try {
checkoutDetails.put("num_products", 2);
checkoutDetails.put("cart_value", 12998.44);
checkoutDetails.put("deep_link", "myapp://myapp/cart");
} catch (JsonException e) {
}
qg.logEvent("checkout_initiated", checkoutDetails);
Checkout Completed:
QG qg = QG.getInstance(getApplicationContext());
JSONObject checkoutCompleted = new JSONObject();
try {
checkoutDetails.put("num_products", 2);
checkoutDetails.put("cart_value", 12998.44);
checkoutDetails.put("deep_link", "myapp://myapp/cart");
} catch (JsonException e) {
}
qg.logEvent("checkout_completed", checkoutDetails, 12998.44);
/* Or if you do not want to pass the third argument, you can simply write
qg.logEvent("product_purchased", productDetails);*/
Product Rated:
QG qg = QG.getInstance(getApplicationContext());
JSONObject rating = new JSONObject();
try {
rating.put("id", "1232");
rating.put("rating", 2);
} catch (JsonException e) {
}
qg.logEvent("product_rated", rating);
Searched:
QG qg = QG.getInstance(getApplicationContext());
JSONObject search = new JSONObject();
try {
search.put("id", "1232");
search.put("rating", 2);
} catch (JsonException e) {
}
qg.logEvent("product_rated", rating);
Reached Level:
QG qg = QG.getInstance(getApplicationContext());
JSONObject level = new JSONObject();
try {
level.put("level", 23);
} catch (JsonException e) {
}
qg.logEvent("level", rating);
Your custom events
Apart from above predefined events, you can create your own custom events, and have custom parameters in them:
QG qg = QG.getInstance(getApplicationContext());
JSONObject json = new JSONObject();
try {
json.put("my_param", "some value");
json.put("some_other_param", 123);
json.put("what_ever", 1234.23);
} catch (JsonException e) {
}
qg.logEvent("my_custom_event", json);
Retrieving stored notifications
We provide the facility to store the notifications that you send. To enable notification storage, please contact us at app@qgraph.io. We automatically store the notifications which arrive at the SDK, and you can access them at any point of time. Here is how you access stored notifications:
JSONArray storedNotifications = QG.getInstance(context).getStoredNotifications();
Different notifications have different fields. All of them have a title and
message. They may also have imageUrl (URL of icon image), bigImageUrl
(URL of the big image), deepLink and some other fields depending on the type
of the notification.
Configuring Batching
Our SDK batches the network requests it makes to QGraph server, in order to optimize network usage. It flushes data to the server every 15 seconds, or when number data points exceed 100.
You can force the SDK to flush the data to server any time by calling the following function:
QG.getSharedInstance(context).flush();
InApp Notifications
InApp notfications work by default and you do not have to do anything specific.
In case you wish to disable in-app notifications in some Activity, call:
QG.getInstance(context).hideInApp(Activity activityInWhichInAppIsToBeHidden)
Note that hideInApp(activity) should be called before onStart() of activity in which you wish to hide in-app gets called.
Event Attribution
To track how QG notifications are affecting the metrics on your app, we attribute some of your app events to QG notifications. We support two types of attributions: view through attribution and click through attribution. We view-through attribute an event to a notification if the event happens within 1 hour (this can be configured) of a user receiving a notification. We click-through attribute an event to a notification if the event happens within 24 hours (this can be configured) of a user receiving a notification.
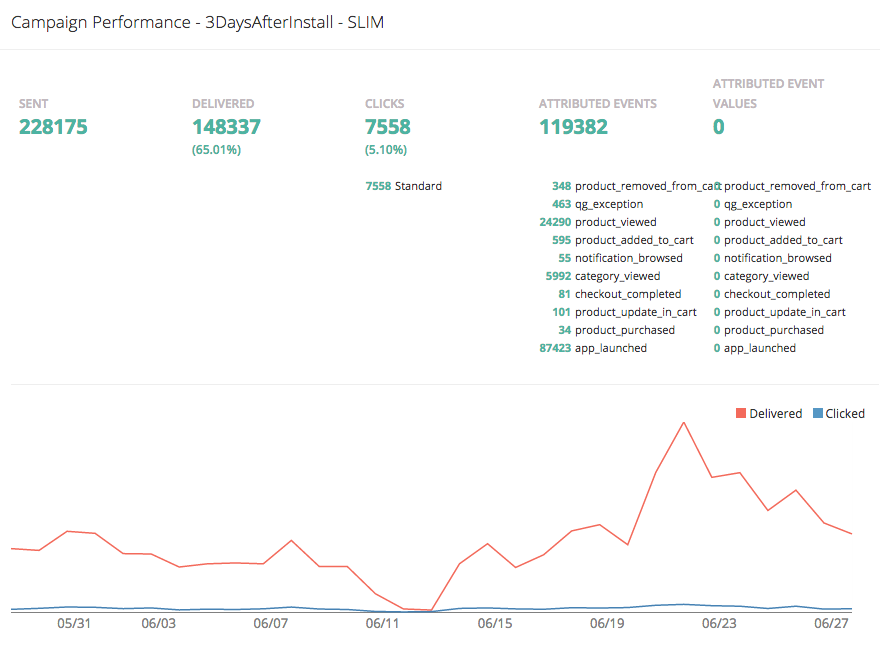
You can see the attribution metrics on the performance page of the campaigns:
You can change view through attribution window by using following function:
QG.getInstance(context).setAttributionWindow(long seconds);
You can change click through attribution window by using following function:
QG.getInstance(context).setClickAttributionWindow(long seconds);
Notification checklist
Launcher image
Make sure that you have an image called ic_launcher.png in your drawable/ folder.
We use this image to display as icon image if you don’t set an icon image explicitly.
This image should be 192px x 192px or larger, with an aspect ratio of 1:1.
Notification image
Make sure that you have an image called ic_notification.png in your drawable/ foler.
This is the image shown in the status bar when a notification arrives. As per Android
guidelines (http://developer.android.com/design/patterns/notifications.html) this image should
be a white image on a transparent background. The size of this image should be 72px x 72px or
larger, with an aspect ratio of 1:1. This is what ic_notification.png should look like:
https://developer.android.com/samples/MediaBrowserService/res/drawable-hdpi/ic_notification.png
Recommended sizes of images
Follow are the recommended sizes of images:
- Big Image Notification - Big image should be 1024px x 512px or larger, with an aspect ratio close to 2:1
- Icon Image - Icon image should be 192px x 192px or larger, with aspect ratio of 1:1
- Carousel Notification - Recommended image size is 600px x 600px, with aspect ratio of 1:1
- Slider Notification - 1024px x 512px or larger, with aspect ratio close to 2:1
- Static Banner Notification - 1024px x 170px with an aspect ratio of 6:1
- Animated Banner Notification - a series of images of 1024px x 170px with an aspect ratio of 6:1
Depending on the screen’s resolution android crops the image to fit it into the container. For this, we recommend that you do not have any text in the 10% margins of Big Image and Carousel.
If you use your own Service to extend GCMListenerService
If you use your own service that extends GCMListenerService, following code snippet
must be added in your service:
@Override
public void onMessageReceived(String from, Bundle data) {
    if (data.containsKey("message") && QG.isQGMessage(data.getString("message"))) {
        Context context = getApplicationContext();
        Intent intent = new Intent(context, NotificationJobIntentService.class);
        intent.setAction("QG");
        intent.putExtras(data);
        JobIntentService.enqueueWork(context, NotificationJobIntentService.class, 1000, intent);
        return;
    }
}
Receiving key value pairs in activity
If you have set key value pairs in the campaign you can get them in the activity. Let’s say
you passed a key valled myKey in the campaign, then you can get its value as following:
@override
protected void onCreate(Bundle savedInstanceState) {
   super.onCreate(savedInstanceState);
   Intent intent = getIntent();
   Bundle bundle = intent.getExtras();
   String val = null;
   if (bundle != null) {
       val = bundle.getString("myKey");
   }

   /* More code */
}